
This is the 4th article for the installation and configuration for Always On Vpn.
Today i will explain how to configure the Windows 10 VPN Client for domain join PC's and not domain join PC's.
We have configure everything from the side of the Servers and we are ready to create the VPN Connection for the client.
So let's do it !!
How to configure VPN for a domain join client computer
We have install User and Computer for all the PC's that must connect with the VPN and we will start to configure the VPN.
Remember that the VPN Configuration of the authentication in your Windows Client must match the Network Profile Authentication settings in your NPS.
We have already create a Network Profile in the NPS in the article Always on VPN - Install and Configure VPN and Network Policy Server
- Login in the PC with the user credential
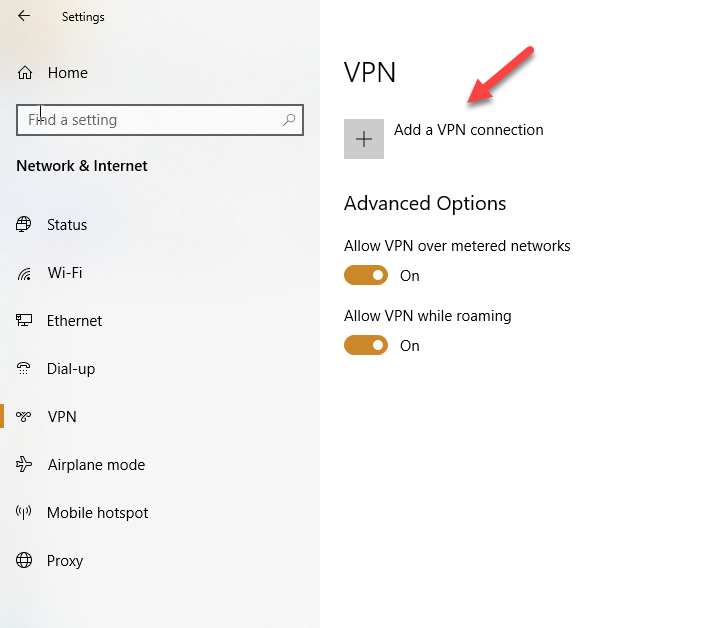
- Click Start and select Settings
- Click in Network and Internet
- Select the VPN from the left side
- Click in Add a VPN Connection
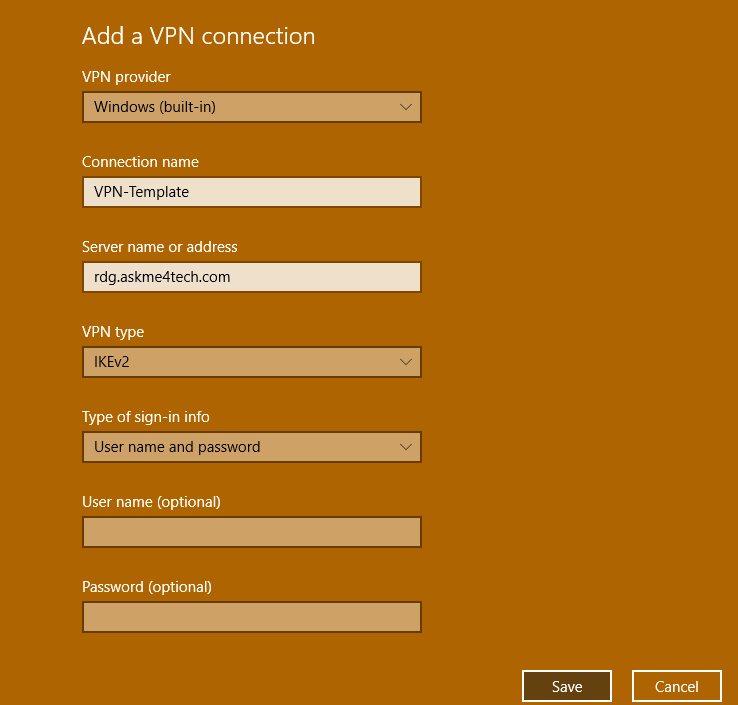
- Select the VPN Provider. You don't have any option just only the Windows built in
- Type the name of the Connection
- Type the server name which is the public name that you gave on the vpn server.
- In this scenario is the rdg.askme4tech.com
- In the VPN type select IKEv2
- Click Save

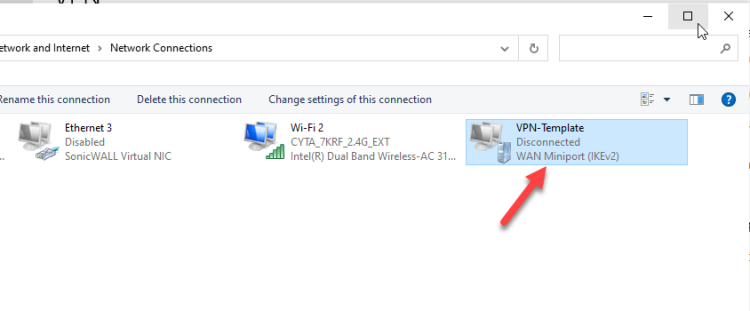
- From the right side click Change adapter options

- Right click in the VPN that created before few seconds and select Properties
- Click in Security Tab
- In Data encryption change to Require encryption (disconnect of server declines). Be sure that you have check it in the Settings -- Encryption of the Network Policy that you have already created.
- Check the Use Extensible Authentication Protocol (EAP)
- Select the Microsoft Protected EAP(PEAP)(encryption enabled)

- Click in Properties
- Check the the followings
- Verify the server's identify by validating the certificate
- Connect to these servers (.....)
- Type the FQDN of the NPS Server
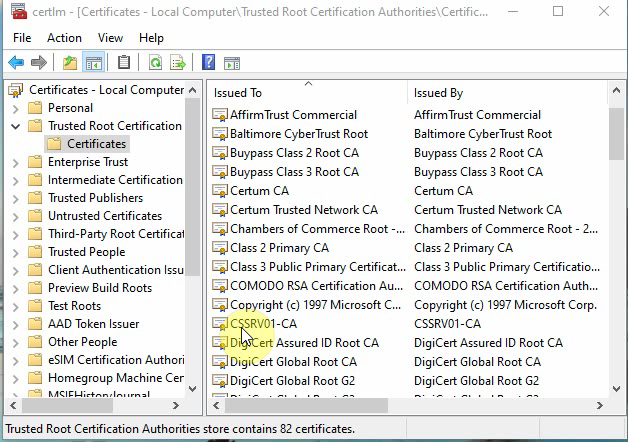
- In the Trusted Root Authorities check the Certificate that you have install from your CA
- In the Notifications before connecting select the Don't ask user to authorize new servers or trusted CAs
- In the Select Authentication method select the Smart Card or other certificate.
- Check the the followings

- Click Configure.
- Check the Use the certificate on this computer and verify that all the above are tick as you can see in the image.
- Also type the internal FQDN of your NPS
- Check the computer certificate which request and install from the CA.
- Check the don't prompt users to authorize new servers or trusted certification authorities.

How to configure VPN for a non-domain join client computer
Prior the creation of the VPN Profile in the Windows PC which it's not domain join we must create another Network Profile in the NPS because we will use different authentication method for these PC.
How to create a Network Profile for the non domain join client computer
- Login in your NPS
- From the Server Management open the Network Policy Server
- Right click in the Network Policies -- New
- Type the policy name and select Remote Access Server (Dialup VPN). Click Next

- Click Add and go down to select NAS Port type. Click in (Virtual)VPN. Click OK and OK

- Click Add once again. Select the User Groups. Click Add and find out the User Group that you have already create in the Active Directory for the users which will connect through VPN. Click OK and OK
- Click Next

- Leave the Access granted. Click Next

- Clear all the tick from the Less Secure Authentication methods.
- On the EAP Types remove the Microsoft Protected EAP(PEAP)(encryption enabled) and select the Secure Password (EAP-MSCHAP v2)
- Click Next.

- These are optional settings. Take a time to explore it if you want. For example you can disconnect idle sessions after period of time. Click Next

- Select Encryption and leave with tick only the Strong and Strongest encryption. Click Next

- Click Finish
How to create the VPN Profile for the non domain join client computers
When you have only Pc's join in the Domain the steps it's easier because you will enroll any Certificate from the Certificate templates of your CA.
But when you must use VPN in an non domain join client computers then it's more difficult how and where should install the Certificates that needs.
First of all before start to create the VPN Profile you must be aware of :
If you plan to use MSCHAv2, EAP-MSCHAPv2 or Protected EAP with MSCHAPv2 you don't required Certificates and you can start to create the VPN Profile.
However if your requirements is to verify the server identity by validating the certificate when using PEAP then the non domain join client computer must has the certificate of your root CA in the Trusted Root Certification and the certificate of your subordinate CA installed in the Intermediate Certificate Authorities certificate store.
Now that we have create the appropriate Network Profile in the NPS and you have decide if you will use Certificates or not let's jump to the client computer and start create the VPN Profile
- Login in the PC with the user credential
- Click Start and select Settings
- Click in Network and Internet
- Select the VPN from the left side
- Click in Add a VPN Connection

- Select the VPN Provider. You don't have any option just only the Windows built in
- Type the name of the Connection
- Type the server name which is the public name that you gave on the vpn server.
- In this scenario is the rdg.askme4tech.com
- In the VPN type select IKEv2
- Click Save
- From the right side click Change adapter options

- Right click in the VPN that created before few seconds and select Properties

- Click in Security Tab
- In Data encryption change to Require encryption (disconnect of server declines). Be sure that you have check it in the Settings -- Encryption of the Network Policy that you have already created.
- Check the Use Extensible Authentication Protocol (EAP)
- Select the Microsoft Protected EAP(PEAP)(encryption enabled)

- If you plan to verify the server identity by validating the certificate when using PEAP then you can follow the steps unless you don't need
- Click in Properties
- Check the the followings
- Verify the server's identify by validating the certificate
- Connect to these servers (.....)
- Type the FQDN of the NPS Server
- In the Trusted Root Authorities check the Certificate that you have install from your CA
- In the Notifications before connecting select the Don't ask user to authorize new servers or trusted CAs
- In the Select Authentication method select the Secure Password (EAP-MSCHAP v2)
- Check the the followings

Now we are ready to connect client computers with the VPN and works from home behind a secure environment.
It's a lot of work but today definitely needs a secure environment to allow users works from home or working remotely from any location.
I already use this solution and time to time i will write or update existing document with more details.
Have a nice weekend!!!


