
This is the third article for the installation and configuration of the Always ON VPN.
Today i will cover what are the requirements of the Certificates for the Servers , Users and Computers.
Also i will explain how can create a GPO that will auto-enroll the certificates in the Users and Computers.
So let's start !!
Create the appropriate Groups in the Active Directory
Before begin to enroll or create the Certificate templates we must create the following Security Groups in the Active Directory.
VPN Users include the users which allow to connect with the VPN
VPN Computers = Include the computers that will auto enroll the certificates
VPN Servers = Include the VPN Server or Servers
NPS Servers = Include the Network Policy Server
Create the Group Policy for certificate Autoenrollment
The next step is to create the Group Policy that will allow the users and computers to request and retrieve certificates taht will allow VPN connection automatically.
- So open the Group Policy Management Console
- Go to Computer Configuration Windows Settings – Security Settings -- Public key Services- Certificate Service Client – Auto –Enrollment.
- Change the Configuration Mode to Enable
- Tick the followings:
- Renew expired certificates, update pending certificates, and remove revoked certificates
- Update certificates that use certificate templates
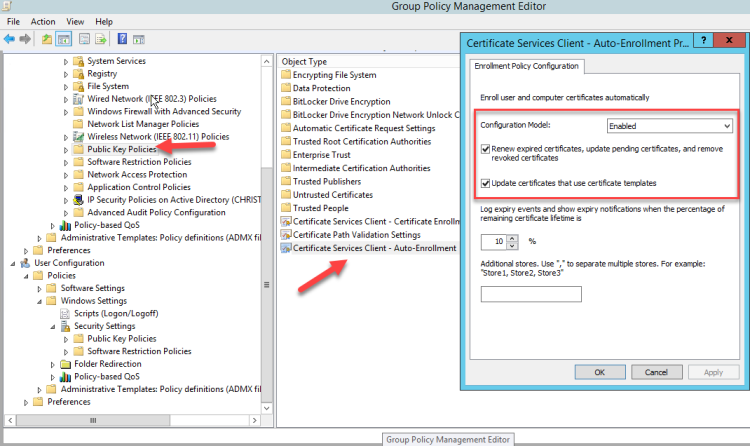
Do the same in User Configuration Windows Settings – Security Settings -- Public key Services- Certificate Service Client – Auto –Enrollment

The Group Policy scope must include the VPN Users and VPN Computers Group and should be link in the domain.

Create the Certificate Template for the VPN Servers
In order to request a Certificate from the Server before we must already create the appropriate template.
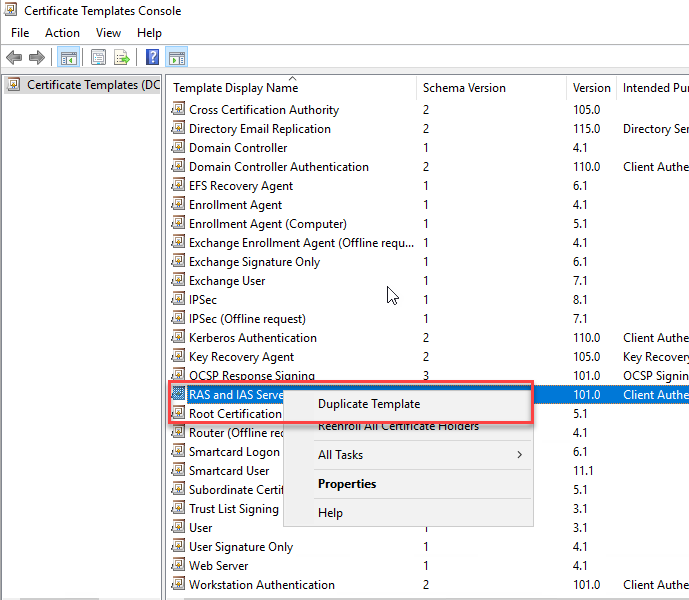
- So login in the CSSRV02 which is the Sub CA
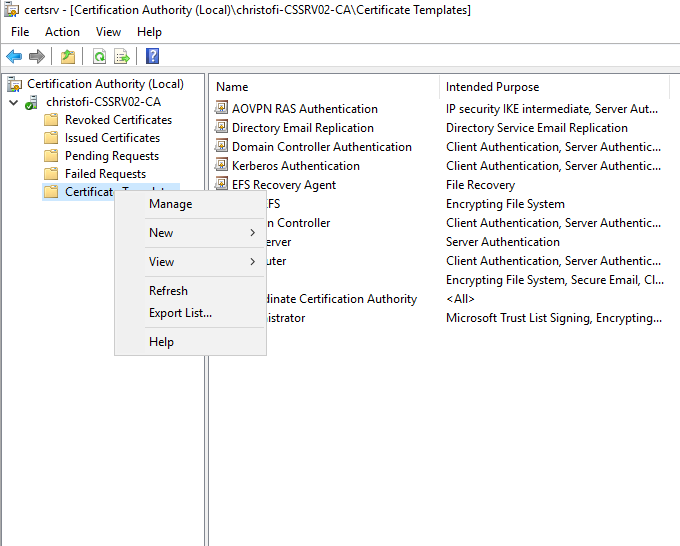
- Open the Certificate Authority Console
- Right click in Certificate Templates and click in Manage

Right click in RAS and IAS Server and click in Duplicate
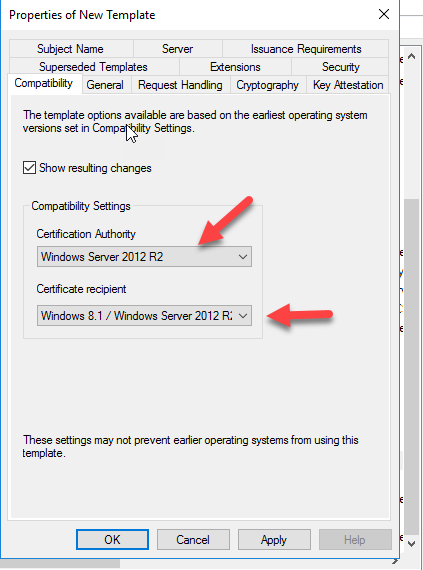
In Compatibility Tab change the Certificate Authority to Windows Server 2016 and the Certificate Recipient to Windows 10 /Windows Server 2016

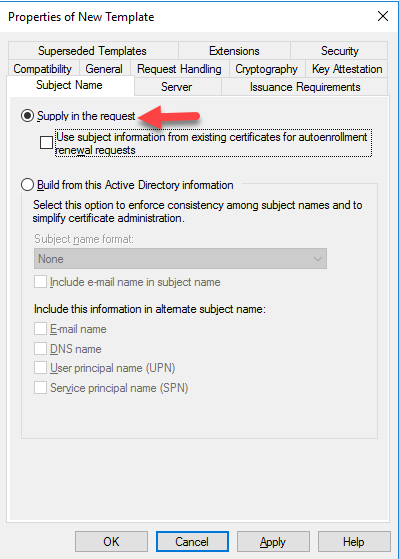
In the subject Name Tab select the Supply to request.
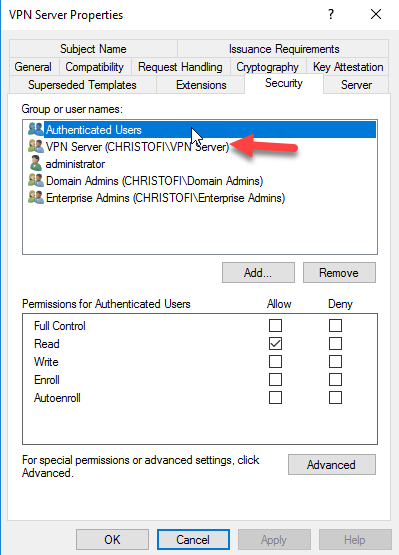
In the Security Tab add the VPN Servers group and tick the Read and Enroll permission. Remove the Authenticated Users.
In the General Tab give a name like VPN Server
In the Extensions Tab select the Application Policies and click Edit
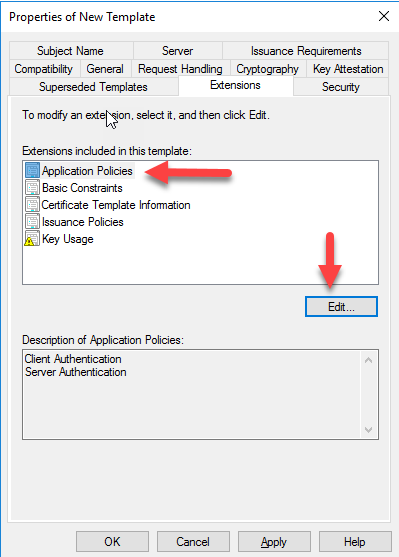
Click Add and to add the IP security IKE intermediate.
Click OK and Apply.

You will receive a Warning. Just click OK

Once again Click OK
Right click in the Certificate Template
Select New -- Certificate Template to issue

Select the VPN Server Template. Click OK
Now you will see in the Certificate Templates and will be available in the VPN Server group
Create the Certificate Template for the NPS Servers
Open the Certificate Authority Console
Right click in Certificate Templates and click in Manage
Right click in RAS and IAS Server and click in Duplicate

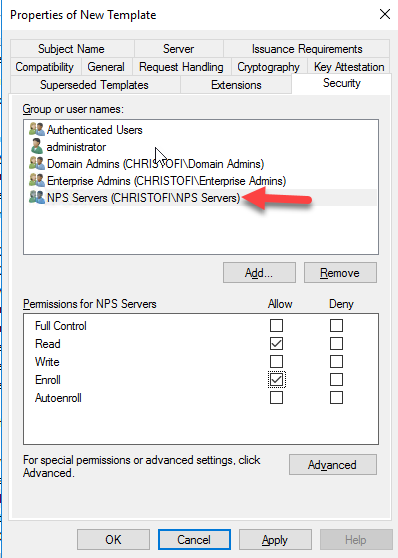
In the Security Tab add the NPS Servers group and tick the Read and Enroll permission. Remove the Authenticated Users.
In the General Tab give a name like NPS Server

- Click OK
- Right click in the Certificate Template
- Select New -- Certificate Template to issue

Select the NPS Servers Template. Click OK

Now you will see in the Certificate Templates and will be available in the NPS Servers group
Create the Certificate Template for the VPN Users
Open the Certificate Authority Console
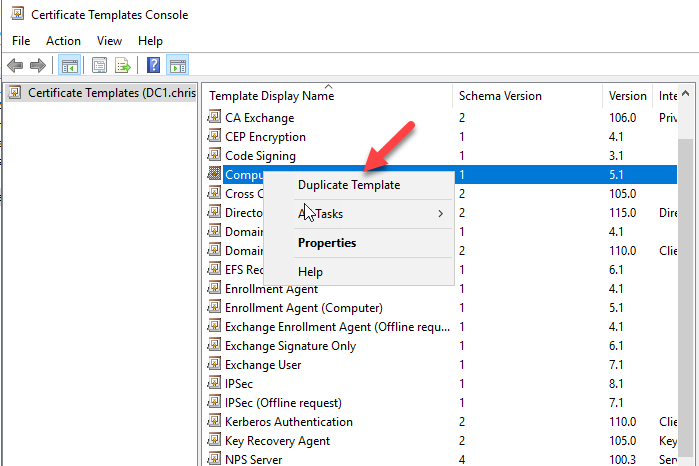
Right click in Certificate Templates and click in Manage

Right click in User Template and click in Duplicate

In Compatibility Tab change the Certificate Authority to Windows Server 2016 and the Certificate Recipient to Windows 10 /Windows Server 2016
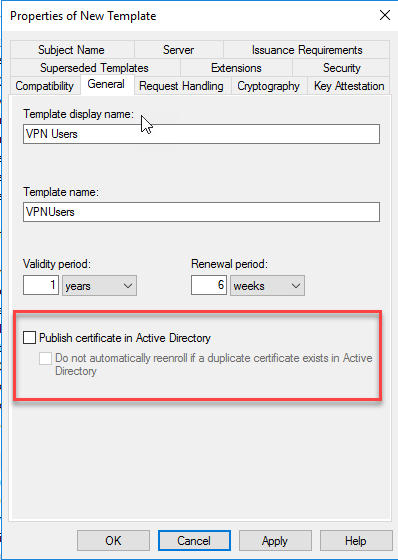
In the General Tab give a name like VPN Users and clear the Publish Certificate in Active Directory
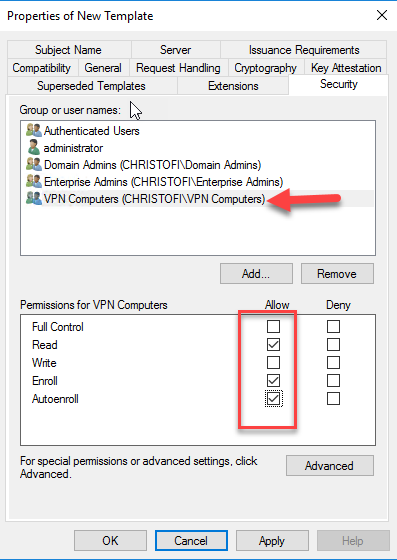
In the Security Tab add the VPN Users group and tick the Read ,Enroll and Auto enroll permission. Remove the Users Group

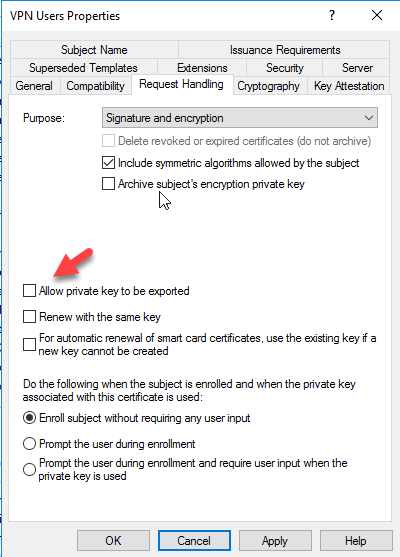
In the Request Handling Tab clear the Allow private key to be exported.
In the Cryptography Tab change the Provider Category to Key Storage Provider.
Select the Request must be one of the following providers and select Microsoft Platform Crypto Provider

In the Subject Name select the Build from Active Directory information and leave only the User Principal Name(UPN)

Click OK
Right click in the Certificate Template
Select New -- Certificate Template to issue

Select the VPN Users Template. Click OK

Now you will see in the Certificate Templates and will be available in the VPN Users group
Create the Certificate Template for the VPN Computers
Open the Certificate Authority Console
Right click in Certificate Templates and click in Manage

Right click in Computer Template and click in Duplicate
In the Security Tab add the VPN Computer group and tick the Read ,Enroll and Auto Enroll permission. Remove the Domain Computers.
In the General Tab give a name like VPN Computers.
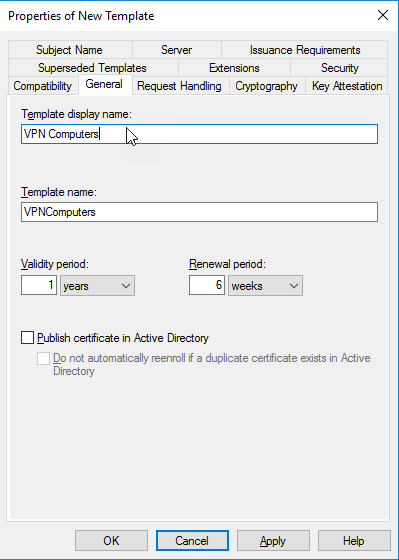
Click OK
Right click in the Certificate Template
Select New -- Certificate Template to issue

Select the VPN Computers Template. Click OK
Now you will see in the Certificate Templates and will be available in the VPN Server group
How to Deploy the Certificates
We have create the appropriate templates and we are ready to Deploy the Certificates in the Servers and Computers.
In the VPN Server we must manual request and install the Certificate. But in the NPS and the Computers that will connect with the VPN will be autoenroll because we have already create the GPO
Deploy the Certificate in the VPN Server
Login in the VPN Server and type certlm.msc in the Run command
This command will open the Local Certificate Console for Computers
Right click in Personal select All Tasks - - Request a New Certificate

Click Next in the Welcome Wizard

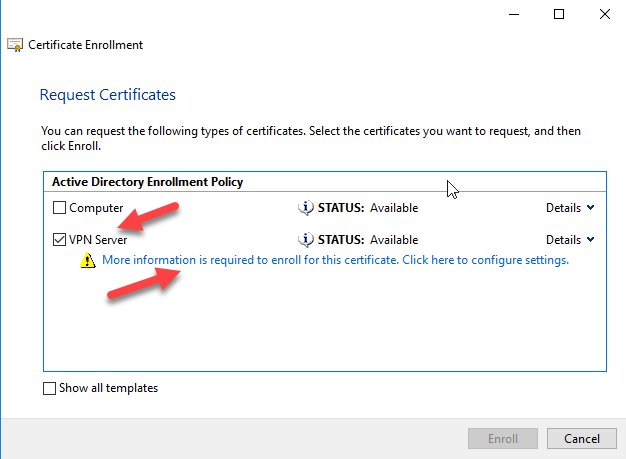
You will see the Active Directory Enrollment Policy. Click Next

Find out the VPN Server Template. First you must click in the More information is required to enroll this certificate .....
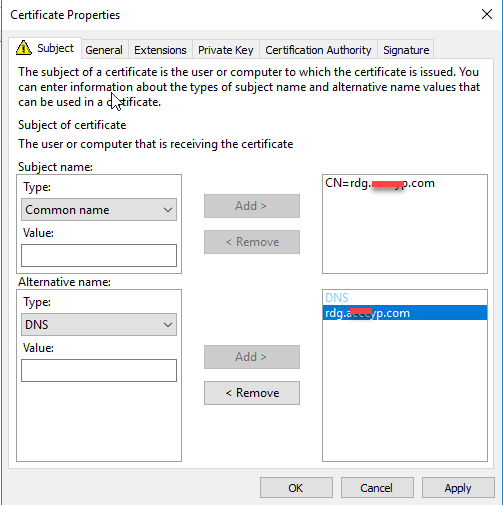
In the Subject Name select the Common Name.
Type the public DNS Name for the VPN Server that will use. Be careful you don't must write the internal FQDN of the VPN Server.
You must have decide to use a Public DNS Name with a DNS A Record in your Provider to point in your Public IP Address.
For example for me is rdg.askme4tech.com
Click Add
In the Alternative name select DNS and type again the public DNS Name and Click Add.
Now click Enroll
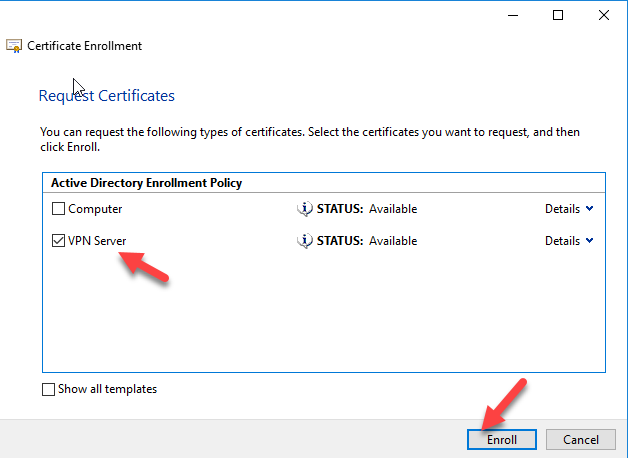
Click Finish
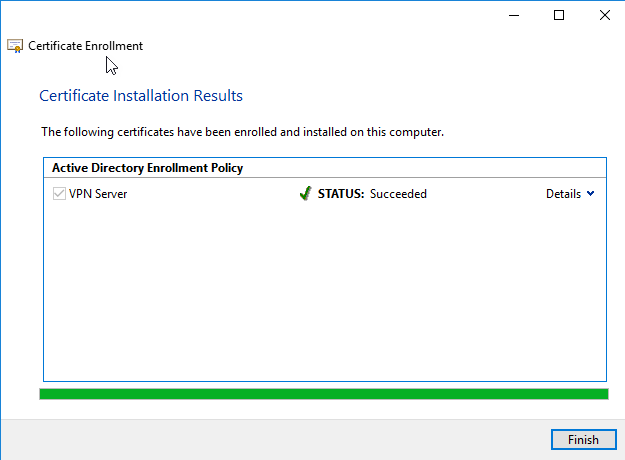
Go in Personal -- Certificate and you will see the Certificate
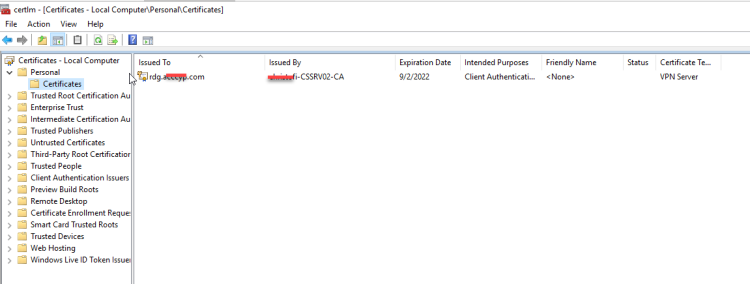
Validate the Certificate in the NPS Server , Users and Computers
Because you have allow the auto enroll the Certificate in the NPS Server , Users and Computers the only that you must do is to run the gpupdate /force and restart every Computer and NPS Server that included in the Groups.
After restart run the certlm.msc top open the Certificate Console for the Local Computer
Go in Personal -- Certificate and verify that a new certificate with the name of your computer name created

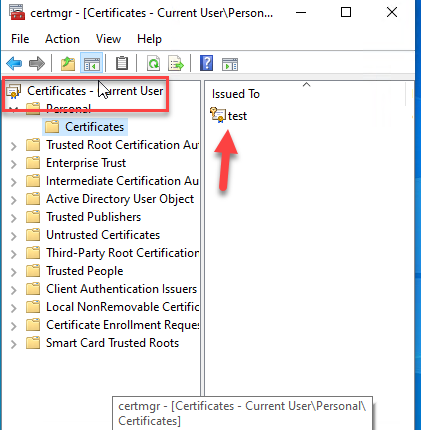
Now run once the certmgr.msc to open the Certificate Console for the User
Go in Personal -- Certificate and verify that a new certificate with the username created
We finished the requirements of the Certificates for the Always ON VPN and we are ready to connect the users with the VPN that will explain in the next article.
Have a nice weekend !!


