Always on VPN- Install and configure Active Directory Certification Services
Today we will going to install and configure Active Directory Certificate Services which is a requirement for the Always-ON VPN.
To be honest maybe should be the first step before proceed with the installation of NPS and RRAS Roles but never mind.
It's not an easy task and need to be very careful.
So let's start step by step without hurries to completed successful
If you are not familiar with the Active Directory Certification Services you must know that first of all must be think very seriously how you would like to design the infrastructure of PKI Solution.
You can find different ways but today will use the Offline Root CA Setup.
This infrastructure consist of an Offline Root CA and one Online Sub CA.
CSSRV01 will be the Offline Root CA
CSSRV02 will be the Online Sub CA.
Let's start
How to install Active Directory Certificate Services Roles
The following steps must be done in both Servers CSSRV01 and CSSRV02
- From Server Manager -- Manage --Add Roles & Features
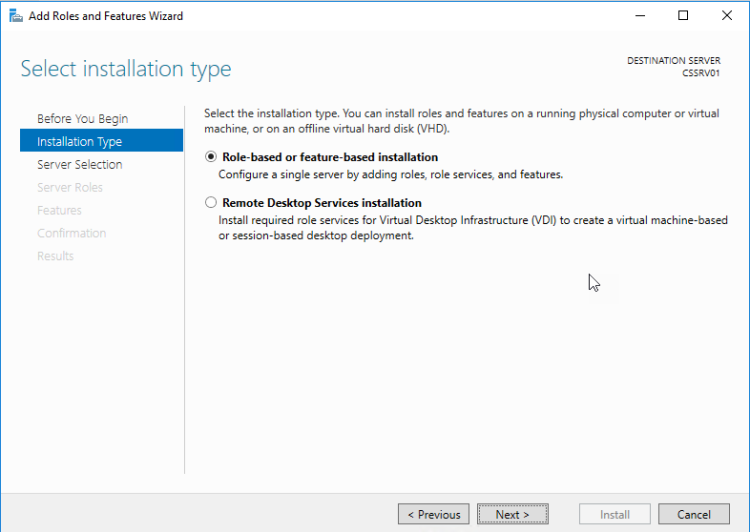
- Click Next on the first Windows
- Keep the default settings and click Next
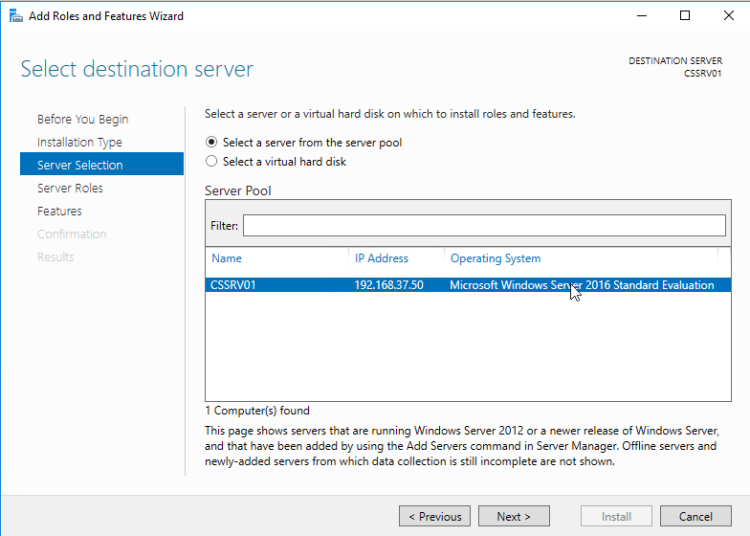
- Verify the Server that will be install the Role and click Next
- Check on Active Directory Certification Services and click in button Add Features to add the required Features to proceed.
- Click Next
- In the Features don't change anything and click Next
- Check the Certification Authority
- Click Install and Wait until finish.
Offline Root CA Configuration
- From the Server Manager click on Configure Active Directory Services ...
- First step read the requests to proceed as Offline Root CA. Make sure that all the requirements are met. Then click Next
- Check the Certification Authority. Click Next
- Select the Standalone CA. Click Next
- Select the Root CA. Click Next
- Select the Create a new private key. Click Next
- Change the Key length to 4096. Click Next
- Leave it as it and proceed to the Next step
- Select how many years for the validity period for the certificate. Click Next
- Specify the database location. Recommended to be in different disk of C:. Click Next
- Click Configure .
- Click Close after the Configuration suceeded
Configuration of CDP and AIA Extensions
- From Server Manager open the Certification Authority
- Right click on Server and select Properties
- Click on Extension Tab
- In the Select extension be sure that the CRL Distribution Point (CDP) is selected
- Delete everything except the ldap
- Click Add
- In the location type the D:\CRL\ . The other values selected from the Variable
- Every time which select one click Insert.
- Click OK
- Select the Location that added and be sure that are checked the
- Publish CRLs to this Location
- Publish Delta CRLs to this Location
- Click on ldap and be sure that are checked the
- Include in all CRL's. Specify where .......
- Include in the CDP extension of issued certificates
- From the Select extension select the Authority Information Access (AIA)
- Delete everything except the ldap
- Click Add
- In the location type the D:\AIA\ .
- The other values selected from the Variable
- Every time which select one click Insert.
- Click OK
- Click on ldap and be sure that are checked the
- Include in the AIA extension of issued certificates
- Click Apply and will be prompt to restart the Active Directory Certificate Service. Click Yes
Configure CRL and Certificate Validity Period
- Now go in the Certificate Authority Console
- Right click in Revoked certificates and click All Tasks - Publish
- Leave the New URL.
- In order to configure the Validity Period (In years) of the certificate run the following commands:
-
certutil -setreg ca\ValidityPeriodUnits 20
-
certutil -setreg ca\ValidityPeriod "Years"
-
-
-
In order to configure the Validity Period (In Weeks) of the CRL run the following command
-
certutil -setreg CA\CRLPeriodUnits 12
-
certutil -setreg CA\CRLPeriod "Weeks"
-
-
After run these commands must be restart the Active Directory Certificate Service
-
Because Offline Root CA it's not join in the Domain must configure manual which is the DN (Distinguished Name ) in the Active Directory
-
We must do it manual
-
Run the following command to configure the DN (Distinguished Name ) of the Active Directory with your appropriate values in the DC
-
Certutil –setreg ca\DSConfigDN "CN=Configuration,DC=yourdomain,DC=Domain"
-
-
Once again restart the Active Directory Certificate Service.
Publish the Root CA CRL and AIA in the Active Directory
Last step ti finish with the Root CA Configuration is to publish CRL and AIA in the Active Directory.
Because Offline ROOT Ca is not join in the domain you must
- Copy the crl and crt files in the CSSRV02 (Online SUB CA)
- Then from CSSRV02 run the following commands
- To publish CRL run the following command
- certutil –dspublish –f <CRLFile> <CAName>
- To publish the crt file run the following command
- certutil –dspublish –f <CACertificateName>
Online Sub CA Configuration
- From the Server Manager click on Configure Active Directory Services ...
- First step read the requests to proceed as Online Sub CA. Make sure that all the requirements are met. Then click Next
- Check the Certification Authority. Click Next
- Select the Enterprise CA. Click Next
- Select the Subordinate CA. Click Next
- Select the Create a new private key. Click Next
- Change the Key length to 4096. Click Next
- Leave it as it and proceed to the Next step
- Select the path to save the certificate request .Click Next
- Specify the database location. Recommended to be in different disk of C:. Click Next
- Click Configure .
- Click Close . Don't worry about the Warning because it will be the next step
How to install CA Certification in Online Sub CA
Submit the CA Certification Request
- Copy the file which generated in the C:\ to the CLSRV01
- From the CLSRV01 open the Certification Authority console
- Right click in the Server All Tasks -- Submit new Request
- Now go in Pending Requests. Right click in the Request All Tasks -- Issue
- Once the request issued go in the Issue Certificates.
- Right click in the Certificate and click Open
- Click in Tab Details and click Copy to File
- Select the Format DER encoded X.509 (.CER) and click Next
- Specify the path that you want to save the Certificate. Click Next
- Click Finish
- Copy the certificate in the CLSSRV02
Install the CA Certificate in the Online Sub CA
- In the CSSRV02 open the Certification Authority.
- Right click in the Server All Tasks -- Install Certificate
- Select the Certificate which exported from the CSSRV01
- When the certificate will be install right click in the Server All Tasks -- Start Service
- Here we go
Configuration of CDP and AIA Extensions
The last step is to configure the CRL and AIA Extensions in Online Sub CA
- Right click in the Server
- Go in Extension Tab
- In the Select extension be sure that the CRL Distribution Point (CDP) is selected
- Delete everything except the ldap
- Click Add
- In the location type the D:\CRL\ . The other values selected from the Variable
- Every time which select one click Insert.
- Click OK
- Select the Location that added and be sure that are checked the
- Publish CRLs to this Location
- Click on ldap and be sure that are checked all except the last one
- From the Select extension select the Authority Information Access (AIA)
- Delete everything except the ldap
- Click Add
- In the location type the D:\AIA\ .
- The other values selected from the Variable
- Every time which select one click Insert.
- Click OK
- Click on ldap and be sure that are checked the
- Include in the AIA extension of issued certificates
- Click Apply and will be prompt to restart the Active Directory Certificate Service. Click Yes


